
Learn how I transformed these chairs from shabby to chic!
LEARN How I transformed two chairs and an ottoman from from shabby to chic!
One of the things they emphasize on HGTV is the importance of “staging” when selling your home. Our beautiful home in Punta Gorda Isles is currently FOR SALE by owner! So,we decided to turn the family/billiard room into a guest suite that’s large enough for a whole family. (Extra guest space is always appreciated in Florida.) To stage our family-sized guest suite we purchased a beautiful bedroom set that matches our bamboo floors. But, I needed two comfortable chairs to stage a seating area.
Click here for a video tour of our home or send us a message if you want a copy of our sale flyer.
My Habitat Adventure
I was shocked to discover that a new set of chairs in the color and style I wanted cost over $900. So, I decided to see if I could find something second hand.
At the Habitat for Humanity Store in Punta Gorda I found two chairs and a matching ottoman that were the style I wanted but definitely NOT the right color. The price was $275 for the set. Because, I knew there was a chance that in transforming them I might ruin them I was hoping to pay less. Fortunately Habitat has a 50% off sale the third Saturday of every month. It’s one of those sales events where everyone lines up early and who ever snags the price tag first wins! I was third in line when the door opened that Saturday morning.
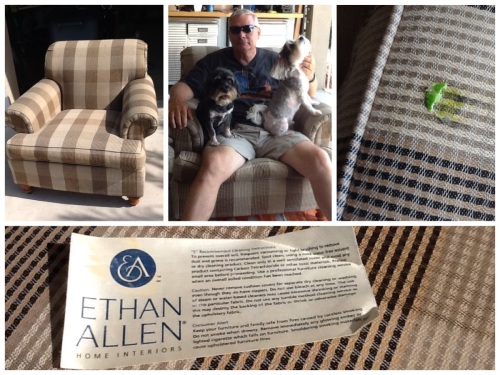
Dennis, Buster and Bo heck out the new chairs.
Here is how I transformed them:
 I transformed the chairs by painting them with satin finish Behr brand latex acrylic paint from Home Depot. So that the fabric would stay soft and supple, I added textile medium to the paint. (It’s what makes painted T-shirts soft.) The textile medium is available at Michael’s Craft Store and at JoAnn’s Fabrics or online. I used seven large bottles for this project at $6 per bottle.
Here are the steps:
1. I spot cleaned the fabric and trimmed loose threads. (One chair had some Skittles candies stuck to the cushion.) I also ran a lint roller over them to capture any pet hairs and lint.

2. Because my chairs had a pattern to the fabric, I decided to prime them first. We had an old can of Kiln’s Primer that was tinted gray in the garage so I used that. (If I you buy new primer have them tint it to match your final color.) For primer coats, I mixed two parts of paint with one part of textile medium. It took three primer coats to make the pattern in the fabric disappear. As you can imagine the first coat barely stained the fabric. But coverage improved with each new coat of paint. I’m so glad I used the primer!
3. I brushed the paint on with a medium-sized paint brush applying thin coats. I used my fingers to make sure the paint got worked into the folds. Between coats, I let the paint dry overnight. And, I sanded rough spots between coats using a fine grit sand paper. Make sure that you get paint into the seams but don’t fill the seams. I ran my fingernail down the seam after painting it so I’d have a crisp finish.
4. The gray chairs looked really contemporary but they didn’t match the room. So it was on to the final candy apple red color. For the final coats I mixed one part paint to one part textile medium. It took two coats of candy apple red to finish the job. When the chairs were finished they looked and felt as supple as leather furniture.
5. I waited a full week before I moved the chairs into the house because I wanted to allow plenty of time for the paint to set and adhere to the fabric. It’s now been over a month since I completed this project. The chairs are holding up great even with the grandkids bouncing around on them. They are getting more supple the more they are used! I couldn’t be happier with the way they turned out!
Total Cost of furniture Project: $229
Click here for more tips on painting textile furniture.
Dennis’ Project

Love this vessel bowl and faucet!

Dennis created this vanity area with vessel sink.
The other project we did for this room was creating a vanity area with a vessel sink. Dennis cut down a tall chest of drawers and installed a contemporary vessel sink and faucet on top. He hung the dresser mirror over the sink to complete the look. Now, guests have a place to primp in the morning and brush their teeth at night without tying up the bathroom!
Extra Sleeping Space
In addition to the king-size bed, the room has love seats lining the windows with extra wide (mattress grade) cushions. The love seat area will sleep three adults or a bunch of grand kids. There is plenty of storage space under the loveseat area to store bedding, a port a crib, suitcases and toys and games! The guest suite overlooks a beautiful canal and opens onto the pool deck.
So…check out our New family guest suite!
Email Us If You are interested in buying our home!
Video of Home for Sale by Owner
This slideshow requires JavaScript.
Be sure to subscribe to our new blog “Life after Pies & Plates!”


